12/30/10
12/21/10
The World’s Number 1 Best Selling BlackBerry Application is ‘Made in Pakistan’!
‘Made in Pakistan’!

Photo Editor, the World’s number one seller, in all categories, on Blackberry App Store happens to be ‘Made in Pakistan’.
Developed by a Lahore-based software company Pepper.PK, the Photo Editor for blackberry has made it to the top of list for paid applications.
Tech Lahore has detailed post on the topic.
Return Of Feed Filters in Facebook
In a time not so long ago, Facebook has a feature which enabled users to filter through feed stories based on the type of story and based on where that story originated from. While it disappeared for some time (after first appearing in 2008), here is a screenshot of the feature back in the new design.
While almost identical to previous filters, the new design fits in with the existing design of the homepage. While I’m not quite sure why feed filters were pulled in the first place, I’m sure there are plenty of power users who will find the return of these filters to be useful. A possilbe reason could be that the 'Friends' page has no more status updates. You can see a screenshot of the filters in action below.
Thanks to Anthony Ramos for the tip!

12/13/10
11/19/10
MIT's laser camera can photograph around corners, render your camouflage useless http://engt.co/bGvobw
11/17/10
10/26/10
10/20/10
How to monitor the Bandwidth Usage in Ubuntu
Recipe: This cool trick comes in handy if you are a WiMax or a satellite internet user AND you are restricted to a daily or monthly bandwidth usage. Apart from the web based interface given to you by the company, it would be nice if you can monitor you daily usage. This would help you SAVE money these ISPs charge when you go just a byte over the restriction.
Ingredients: Conky and vnStat
Code:
sudo vnstat -u -i eth0
to create a database.
then
Code:
vnstat
You can use conky to display vnstat data.
Code:
sudo apt-get install conky
Save this config in your home folder as .conkyrc
Code:
background yes font Sans Seriff:size=9 xftfont DejaVu Sans Mono:bold:size=10 use_xft yes xftalpha 0.8 update_interval 1.0 total_run_times 0 own_window yes own_window_type normal own_window_transparent yes own_window_hints undecorated,below,sticky,skip_taskbar,skip_pager double_buffer yes draw_shades yes draw_outline no draw_borders no draw_graph_borders no minimum_size 300 maximum_width 300 default_color 919FAA default_shade_color 333333 default_outline_color 00ff00 alignment br gap_x 10 gap_y 10 no_buffers yes cpu_avg_samples 2 override_utf8_locale yes uppercase no # set to yes if you want all text to be in uppercase use_spacer right # colours #off white color1 BDAC88 # cream color2 D2B16A # cyan #color3 08A1A1 # bluemoon color3 919FAA # yellow color4 F1BC49 # Green color5 00940F #dark cyan color6 074C4C #grey color7 6b6b6b #orange color8 AF560D #yellow color9 F1BC49 #lua_load /home/glen/conky/draw_bg.lua #lua_draw_hook_pre draw_bg TEXT ${goto 90}${color1}${font DejaVu Sans Mono:bold:size=12}INTERNET USAGE ${goto 90}${voffset -15}______________ ${goto 90}${font DejaVu Sans Mono:bold:size=10}${color3}Down${goto 170}${color9}Up${goto 235}${color5}Total ${goto 10}${font DejaVu Sans Mono:bold:size=9}${color1}Yesterday: ${color3}${execi 300 vnstat | grep "yesterday" | awk '{print $2 $3}'}${goto 170}${color9}${execi 300 vnstat | grep "yesterday" | awk '{print $5 $6}'}${goto 235}${color5}${execi 300 vnstat | grep "yesterday" | awk '{print $8 $9}'} ${goto 10} ${color1}Today: ${color3}${execi 300 vnstat | grep "today" | awk '{print $2 $3}'}${goto 170}${color9}${execi 300 vnstat | grep "today" | awk '{print $5 $6}'}${goto 235}${color5}${execi 300 vnstat | grep "today" | awk '{print $8 $9}'} ${goto 10} ${color1}Week: ${color3}${execi 300 vnstat -w | grep "current week" | awk '{print $3 $4}'}${goto 170}${color9}${execi 300 vnstat -w | grep "current week" | awk '{print $6 $7}'}${goto 235}${color5}${execi 300 vnstat -w | grep "current week" | awk '{print $9 $10}'} ${goto 10} ${color1}Month: ${color3}${execi 300 vnstat -m | grep "`date +"%b '%y"`" | awk '{print $3 $4}'}${goto 170}${color9}${execi 300 vnstat -m | grep "`date +"%b '%y"`" | awk '{print $6 $7}'}${goto 235}${color5}${execi 300 vnstat -m | grep "`date +"%b '%y"`" | awk '{print $9 $10}'}${font}
Alt+F2 and run conky
and you should see the attached pic in the bottom right corner.

10/18/10
How to setup your own Online Radio Station in Ubuntu using JACK and IDJC.
IDJC & JACK setup - The repos way
IDJC - Internet DJ Console..... It uses Jack.... This thing had me stumped for the longest time.... I just couldn't seem to get it to work... I do however now use it all the time. So a simple guide to those who needs to use it. Written for Ubuntu of course. Ive been told you need to install ia32-libs on 64 bit, its one of the first things i install myself so not sure if thats true or not.
Ok, first of all we need Jack. Open a terminal and enter :Code:
sudo apt-get install jackd qjackctl
Open Limits.conf
Code:
sudo gedit /etc/security/limits.conf
Add the following lines into the file :
Code:
@audio - rtprio 99 @audio - memlock unlimited @audio - nice -19
Save and close.
Now open System > Administration > Users and Groups Click the keys where it says click to make changes, put in your password. Click Manage groups. You should find one called audio, if not, add group and call it audio. Add yourself to it. Log out and in again. Run Jack, you should find it in Sound and Video. Click Setup. Below is a couple of pictures of my set up screens. Mimic them, if it doesnt work, you can tweak them.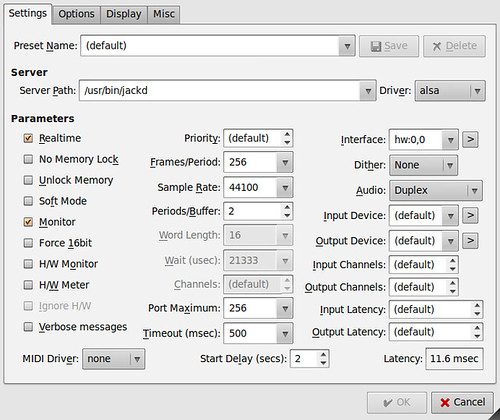 Ok few things in this window. Realtime - Some people find its better to have it turned off, some people cant get it to work at all with this ticked. Frames/Peroid - I have this down to 256. My partner has it at 1024. My friend has it a 2048. Youll have to play with this a bit. Interface - This is where it takes the sound from. If you have a funny sound set up, multiple sound cards, usb sound devices, you may need to tweak this.
 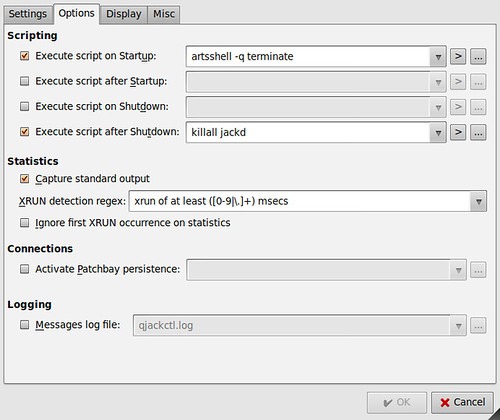 Should work for everyone.
 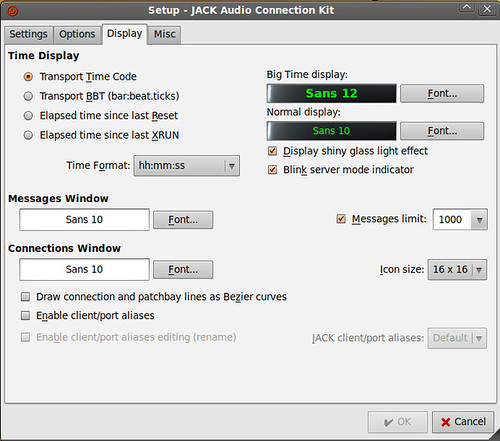 Should work for everyone.
  Personal preferences. But this is my set up. Ok, we have Jack set up, Wewt wewt! Now for IDJC. Open a terminal and give it a :
 Code:
sudo apt-get install idjc
If you want Shoutcast aswell Icecast give one of these aswell :
Code:
sudo apt-get install libmp3lame0 libmp3lame0-dev
If you dont install these Shoutcast will be greyed out in the options. Now open Internet > IDJC
Click Server, drag the boxes bottom corner and expand it out, i mean right out! Theres a lot of options and stuff here but every time i set this up it opens as a tiny little window. This is how i have mine set up. Password poofed of course.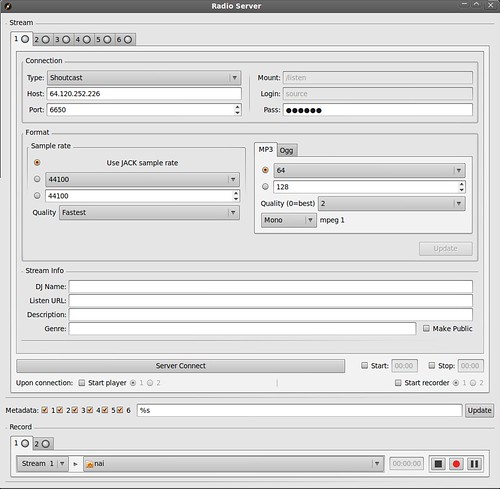 Once its all filled in hit Server Connect. Should start streaming straight away. Simply drag songs out of nautilus into playlist 1 and hit play. You can make a playlist in Rythmbox, highlight the whole playlist and drag it into playlist 1. Means you can pre make them, save them, use them later etc. Press the big mic button in the bottom right corner to talk. I pause the music as the song ends and do my talking but i guess thats DJ dependant.
 How to reinstall / fix GRUB2 after installing / dual booting Windows 7 or Ubuntu 10.10
Reinstalling GRUB 2
There may be times when a user needs to either move or reinstall a GRUB 2 installation. GRUB 2 needs to be reinstalled when a user is presented with a blank screen with only the word "GRUB", no prompt, and no ability to enter commands. This often happens when the MBR of the booting device is altered and GRUB 2 is removed, such as when Windows is installed after Ubuntu. Additionally, if a user cannot boot into an operating system at all, even using the rescue mode mode, a complete reinstallation of GRUB 2 may be necessary.
Reinstalling from LiveCD
If you cannot boot from GRUB 2 review the section Boot Problems and Rescue Mode. If a reinstall becomes necessary follow these instructions. Two methods are presented; both require booting from a LiveCD (Ubuntu 9.10, Karmic Koala or later version). If the first method does not work, follow the second method, which is more complex and contains more options and instructions.
SIMPLEST - Copy GRUB 2 Files from the LiveCD
This is a quick and simple method of restoring a broken system's GRUB 2 files. The terminal is used for entering commands and the user must know the device name/partition of the installed system (sda1, sdb5, etc). The problem partition is located and mounted from the LiveCD. The files are then copied from the LiveCD libraries to the proper locations and MBR. It requires the least steps and fewer command line entries than the following methods.
- Boot to the LiveCD Desktop (Ubuntu 9.10 or later).
-
Open a terminal by selecting Applications, Accessories, Terminal from the menu bar.
-
Determine the partition with the Ubuntu installation. The fdisk option "-l" is a lowercase "L".
- If the user isn't sure of the partition, look for one of the appropriate size or formatting.
sudo fdisk -l
Running sudo blkid may provide more information to help locate the proper partition, especially if the partitions are labeled. The device/drive is designated by sdX, with X being the device designation. sda is the first device, sdb is the second, etc. For most users the MBR will be installed to sda, the first drive on their system. The partition is designated by the Y. The first partition is 1, the second is 2. Note the devices and partitions are counted differently.
-
- Mount the partition containing the Ubuntu installation.
sudo mount /dev/sdXY /mnt
Example: sudo mount /dev/sda1 Note: If the user has a separate /boot partition, this must be mounted to /mnt/boot Note: If the user has a separate /home partition, this must be mounted to /mnt/home. Encrypted home partitions should work.
-
Run the grub-install command as described below. This will reinstall the GRUB 2 files on the mounted partition to the proper location and to the MBR of the designated device.
sudo grub-install --root-directory=/mnt/ /dev/sdX
Example: sudo grub-install --root-directory=/mnt/ /dev/sda
- Reboot
-
Refresh the GRUB 2 menu with sudo update-grub
-
If the user wishes to explore why the system failed, refer to Post-Restoration Commands section below.
METHOD 2 - Copy GRUB 2 Files from the Installed Partition
This is a quick and simple method of restoring a broken system's GRUB 2 files. The problem partition is located and mounted from the LiveCD. The files are then copied from the broken system's /boot/grub directory to the proper locations and MBR. It requires fewer steps and fewer command line entries than the following CHROOT method. For users with separate system partitions, such as a separate /boot partition, or other special circumstances, using the CHROOT method may provide better results.
- Boot to the LiveCD Desktop (Ubuntu 9.10 or later).
- Mount the partition with your Ubuntu installation.
-
From the Places menu, select and click the partition containing your Ubuntu installation to mount it.
-

- If the partition isn't recognized, look for one of the appropriate size or label.
-
Once mounted, the user should see Ubuntu system directories such as /boot
-
-
-
Open a terminal by selecting Applications, Accessories, Terminal from the menu bar.
-
Run the grub-setup -d command as described below. This will reinstall the GRUB 2 files on the mounted partition to the proper location and to the MBR of the designated device.
-
Determine the mount point by referring to the location box in Places. Replace XXXX in the command with the UUID, or replace /media/XXXX with the correct location if the partition is not mounted in /media. The designation may be a UUID, or a label, if the user has created one (see note).
- If the location window is not in the format shown, click on the icon to the left to change the presentation.
-
-
When ready to copy the UUID/location, by highlighting it with the mouse. Paste it into the terminal by pressing the middle mouse button. If using the keyboard, use CTRL-SHIFT to copy the location and CTRL-SHIFT-V to paste it into the terminal.
-
The device/drive is designated by sdX, with X being the device designation. sda is the first device, sdb is the second, etc. For most users the MBR should be installed to sda, the first drive on their system.
Example:sudo grub-setup -d /media/XXXX/boot/grub /dev/sda
sudo grub-setup -d /media/7848138a-41a0-4eba-8aed-d1b625ac8759/boot/grub /dev/sda
-
If the user gets a "error: Cannot open /boot/grub/device.map" message, add the -m switch and path to the device.map to the command as follows:
Example:sudo grub-setup -d /media/XXXXX/boot/grub -m /media/XXXXX/boot/grub/device.map /dev/sda
sudo grub-setup -d /media/7848138a-41a0-4eba-8aed-d1b625ac8759/boot/grub -m /media/7848138a-41a0-4eba-8aed-d1b625ac8759/boot/grub/device.map /dev/sda
-
Other switches are available for use with the grub-setup command. In a terminal, type grub-setup --help for a list of available options.
-
You may find you get a repeated "error: Cannot open /boot/grub/device.map" message. If this happens try rebooting. The UUID method may actually work but throws an error message falsely. Using the label name does not seem to evoke the same repeated error message.
-
- Reboot
-
Refresh the GRUB 2 menu with sudo update-grub
-
If the user wishes to explore why the system failed, refer to Post-Restoration Commands section below.
 Ubuntu 9.10 introduced a new application which can easily assign labels to existing partitions. Access Disk Utility from the System, Administration menu.

METHOD 3 - CHROOT
This method of installation uses the chroot command to gain access to the broken system's files. Once the chroot command is issued, the LiveCD treats the broken system's / as its own. Commands run in a chroot environment will affect the broken systems filesystems and not those of the LiveCD.
-
Boot to the LiveCD Desktop (Ubuntu 9.10 or later). Please note that the Live CD must be the same as the system you are fixing - either 32-bit or 64-bit (if not then the chroot will fail).
-
Open a terminal - Applications, Accessories, Terminal.
- Determine your normal system partition - (the switch is a lowercase "L")
sudo fdisk -l
- If you aren't sure, run
df -Th. Look for the correct disk size and ext3 or ext4 format.
- If you aren't sure, run
- Mount your normal system partition:
- Substitute the correct partition: sda1, sdb5, etc.
sudo mount /dev/sdXX /mnt # Example: sudo mount /dev/sda1 /mnt
-
Only if you have a separate boot partition:
- sdYY is the /boot partition designation (for example sdb3)
-
sudo mount /dev/sdYY /mnt/boot
- Mount the critical virtual filesystems:
sudo mount --bind /dev /mnt/dev
sudo mount --bind /dev/pts /mnt/dev/pts
sudo mount --bind /proc /mnt/proc
sudo mount --bind /sys /mnt/sys - Chroot into your normal system device:
sudo chroot /mnt
- If there is no /boot/grub/grub.cfg or it's not correct, create one using
update-grub
- Reinstall GRUB 2:
-
Substitute the correct device - sda, sdb, etc. Do not specify a partition number.
grub-install /dev/sdX
-
-
Verify the install (use the correct device, for example sda. Do not specify a partition): sudo grub-install --recheck /dev/sdX
-
Exit chroot: CTRL-D on keyboard
- Unmount virtual filesystems:
sudo umount /mnt/dev/pts
sudo umount /mnt/dev
sudo umount /mnt/proc
sudo umount /mnt/sys- If you mounted a separate /boot partition:
sudo umount /mnt/boot
- If you mounted a separate /boot partition:
- Unmount the LiveCD's /usr directory:
sudo umount /mnt/usr
- Unmount last device:
sudo umount /mnt
- Reboot.
sudo reboot
Post-Restoration Commands
Once the user can boot to a working system, try to determine why the system failed to boot. The following commands may prove useful in locating and/or fixing the problem.
-
To refresh the available devices and settings in /boot/grub/grub.cfg
-
sudo update-grub
-
grub-probe -t device /boot/grub
To install GRUB 2 to the sdX partition's MBR (sda, sdb, etc.)
-
sudo grub-install /dev/sdX
sudo grub-install --recheck /dev/sda
-
If you need help on this, just leave a comment or follow me @bithack3r and send me a driect message.
10/15/10
10 things to do after installing Ubuntu 10.10 Maverick Meerkat
So you’ve downloaded Ubuntu 10.10, made yourself a freshly minted copy and installed it with haste. Now what?
Here is our guide to the top 10 post-install must-do’s that will help ensure you get off to a marvellous start with the Maverick Meerkat.
1. Run Update Manager
Just because you’ve installed the latest version of Ubuntu doesn’t mean that there won’t be some updates and patches waiting for you. Make sure you run the update manager (if it doesn’t update you first) so that you’re benefitting from the latest fixes and features.
2. Enable graphics card drivers for 3D fun
If you want to use advanced desktop effects such as Compiz (3d Cube, wobbly windows) then you will need to enable the “official” drivers for your graphics card.
Ubuntu should automatically detect and alert you that 3D drivers are available. If so, you will see a ‘circuit board’ icon appear on the top panel. Click this and follow the prompts.
If Ubuntu fails to detect any hardware (do be patient as this isn’t always instant) then you can manually run the ‘hardware configuration tool’ from the System > Preferences menu.
3. Set up Ubuntu One file sync
Ubuntu One provides all Ubuntu users with 2GB of free online storage space that allows to back up and sync important files, Firefox bookmarks, Tomboy notes and Evolution contacts between computers – as well as any other file or folder you wish.
Head to Applications > Internet > UbuntuOne to get started.
4. Install Ubuntu Tweak and make your life easier
Ubuntu Tweak is a one-stop shop for managing and installing extra applications, tweaking your desktop (such as putting the window controls back on the right and choosing which icons show on the desktop) and allowing you to keep your system in tip-top shape with the built in system cleaning options.

5. Visit the Software Centre to find great apps
One size certainly does not fit all so if you’re wanting to add VLC, install Photoshop rival The GIMP or play some awesome games then look no further than the Ubuntu Software Centre which can be launched from the Applications menu.

Everything is one-click install so browse around – make sure you check out the cool new featured applications section, too!
6. Integrate your browser
By default most browser look pants in Ubuntu so wrap a band-aid around the sore thumb of no-integration and apply a matching theme to your browser of choice
7. Install some indicators
Ubuntu’s Indicator-Applet project – which aims to make panel application entries behave consistently – is pretty neat.
So neat, in fact, that there are a tonne of really neat and useful indicator applets you can add and use.
Everything from screenshot and system load monitoring tools to workspace switchers and USB ejectors.

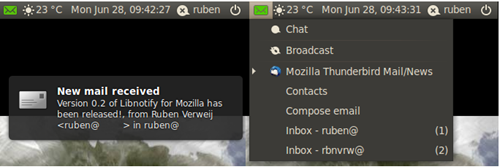
8. Add Gmail, Thunderbird, Google Voice and more to the Messaging Menu
Make the messaging menu (the green envelope) work for you by adding notification support for Gmail, Thunderbird and other applications.
9. Install Nautilus-Elementary
Ubuntu’s default file-browser – Nautilus – is, by default, is a bit of a mess. Add some file-browsing simplicity to your set-up by installing the paired-down, and quite frankly beautiful, Nautilus-Elementary.
Better still the refined replacements comes with many great features not present in normal-Nautilus including a ‘cover-flow’ like browsing view, toolbar editor, built-in terminal, ability to hide the ‘main menu’ and a zoom slider.

You can upgrade Nautilus using the official PPA (Personal Package Archive). Installing this allows you to remain automatically up-to-date with any change and new release.
Add it by entering the commands below in a terminal (Applications > Accessories > Terminal): -
sudo add-apt-repository ppa:am-monkeyd/nautilus-elementary-ppa
sudo apt-get update && sudo apt-get dist-upgrade
10. Enjoy using it!
Finally, to end on a corny note, take some time out to just enjoy using it. Forget about finding and installing new apps or tweaking some part of Maverick for an hour or so and just use Ubuntu like anyone else would: check Facebook in Firefox, chat to your mates on Empathy, type up that letter in Open Office and listen to some music in Rhythmbox.
Ubuntu 10.10 is a fantastic upgrade from 10.04 so take some time to soak in the fantastic achievement of it.
Pssst!
Whilst we are at it – why not subscribe to BitHacker! to find out about the latest news, cool applications, tips, tweaks, gorgeous themes and wallpapers and a healthy side-serving of opinion and bad jokes? C’mon, you know you want to.
- Twitter @BitHacker
10/14/10
10/13/10
Create A Bootable Windows 7 USB Drive From Linux (Tested On Ubuntu 10.10)
I recently had to create a Windows 7 bootable USB flash drive for my friend because he doesn't have a DVD-ROM, and I had to do it from Ubuntu as I don't have Windows (neither at desktop or at laptop).
What I ended up on using is the good old (just a figure of speech) UNetbootin which is available for both Windows and Linux. It's in the Ubuntu repositories so to install it, search for it in the Ubuntu Software Center. For Windows and other Linux distributions, get it from HERE.
At first I didn't think it'll work since you can't choose Windows from the UNetbooting options, but it actually works and I've successfully installed Windows 7 on my friend's computer using UNetbootin. Here's what I did:
Firstly, make sure you have a Windows 7 .ISO file (you can create it from the DVD) and a 4GB USB flash drive (or larger).
1. Install Gparted and format the USB drive to NTFS. In Ubuntu, use the following command to install Gparted:
sudo apt-get install gparted

To format the USB drive as NTFS, open Gparted via the System > Administration > GParted Partition Editor. Then select your USB drive from the top right drop-down. If you only have one hard disk, your USB drive should be "sdb". Now right click your USB drive in GParted and select "Unmount" and you'll then be able to select Partition > Format > ntfs. The drive will be formatted to NTFS in a few seconds.
I'm not sure if UNetbootin will mark the drive as bootable as my USB drive already had the "boot" flag enabled from Gparted, so you may want to enable it too: right click the USB drive and select "Manage flags", then check the "boot" flag.
Then you'll have to mount the USB drive back. You can do it from the command line or Disk Utility (System > Administration > Disk Utility) but to keep things simple, you can just unplug the USB flash drive and plug it back in to the computer.
2. Open UNetbootin, select "Diskimage" and then browse for your Windows 7 ISO file. 
Now at the bottom, check the "Show all Drives" box and then select your USB drive. For me, that's "/dev/sdb1" but it might be different for you (you should know this from Gparted which you've used to format the USB drive under step 1. Important: if your USB drive is "dev/sdb", then you'll have to select "/dev/sdb1" in UNetbootin!). Do not select / check anything else!
Now at the bottom, check the "Show all Drives" box and then select your USB drive. For me, that's "/dev/sdb1" but it might be different for you (you should know this from Gparted which you've used to format the USB drive under step 1. Important: if your USB drive is "dev/sdb", then you'll have to select "/dev/sdb1" in UNetbootin!). Do not select / check anything else!
Now simply click the "OK" button and wait for the files to be copied to the USB drive.
Grub Customizer Lets You Reorder, Add Or Remove GRUB 2 (Or BURG) Menu Entries
Grub Customizer is a new graphical GRUB2 settings manager. For now, it only allows you to edit the GRUB2 menu entries: reorder, rename or add/remove entries. Since these are actually scripts which generate the boot.cfg file, Grub Customizer changes the actual script order and then generates a new boot.cfg so if you then run "sudo update-grub", your customization won't be overwritten.
Once installed, you can find it under Applications > System Tools > Grub Customizer.
Update: Grub Customizer (stating with version 1.1) now supports BURG too!
Even though these are very basic operations, such a tool is very welcome since most GRUB 2 options lack a GUI for easy tweaking.
Further more, Daniel Richter, the Grub Customizer developer plans to add more features in the future, like GRUB 2 recovery functionality for Live CDs or configuring the /etc/default/grub preferences.
Grub Customizer comes with an Ubuntu PPA (the first packages have been uploaded only a few minutes ago) so to install it in Ubuntu (Lucid and Maverick), use the following commands:
sudo add-apt-repository ppa:danielrichter2007/grub-customizer sudo apt-get update sudo apt-get install grub-customizer
Once installed, you can find it under Applications > System Tools > Grub Customizer.
To download the source code or report a bug, see the Grub Customizer project page @ Launchpad.
Update: Grub Customizer (stating with version 1.1) now supports BURG too!
How to customize the clock applet in Ubuntu 10.10
If you’re bored with the look of the default date and time applet in Ubuntu why not jazz it up with one of the following themes?
Instructions on how to do are at the bottom but first the eye-candy!
Stacked
![]()
Just time

OS X Style
![]()
How to change GNOME clock applet theme
- Press ALt+F2
- Type: gconf-editor
- Hit return
- Navigate to “Apps > Panel > Applets > Clock_Screen* > Prefs”
- (* this may be under a different name, just look for the applet that has the correct ‘prefs’ folder)
- Double-click on the ‘Format’ value. Change it to ‘custom’.
- Double click on the ‘Custom Format’ field and paste in the code from one of the styles below.
- Hit return once again and enjoy!
Use any font installed on your system by changing the font on the codes from ‘ubuntu’ to that of your choice (Sans, DroidSans, etc).
If you’ve created your own awesome clock style feel free to share it in the comments below.
10/12/10
The Medibuntu Repository Is Available For Ubuntu 10.10 Maverick Meerkat
Medibuntu (Multimedia, Entertainment & Distractions In Ubuntu) is a repository of packages that cannot be included into the Ubuntu distribution for legal reasons (copyright, license, patent, etc).
The Medibuntu repository is available (was released seconds ago) for Ubuntu 10.10 Maverick Meerkat - I know many of you were waiting for it so here is how to add it to your sources.list:
sudo wget --output-document=/etc/apt/sources.list.d/medibuntu.list http://www.medibuntu.org/sources.list.d/$(lsb_release -cs).list cd && wget http://packages.medibuntu.org/pool/free/m/medibuntu-keyring/medibuntu-keyring_2008.04.20_all.deb && sudo dpkg -i medibuntu-keyring_2008.04.20_all.deb && rm medibuntu-keyring_2008.04.20_all.deb sudo apt-get update
To make the Medibuntu packages show up in the Ubuntu Software Center, install this package:
sudo apt-get install app-install-data-medibuntu
You can then install whatever you need from the Medibuntu repositories, like encrypted DVDs support (libdvdcss2), codecs (w32codes or w64codecs) and so on. Please note that some packages are missing such as Google Earth, mplayer-gui and mplayer-nogui as well as Real Player. These packages might just be delayed - you can however try to download the Lucid .debs and install them.
A complete list of packages for the Ubuntu 10.10 Maverick Meerkat Medibuntu repository can be found here.
10/10/10
Ubuntu 10.10 (Maverick Meerkat) is Released and download links, Happy 10.10.10 :)
Ubuntu team is pleased to announce Ubuntu 10.10.Codenamed “Maverick Meerkat”, 10.10 continues Ubuntu’s proud tradition of integrating the latest and greatest open source technologies into a high-quality, easy-to-use Linux distribution.
Download ubuntu 10.10 and other versions
The following link will direct you to a download location near you:
http://www.ubuntu.com/testing/download (Ubuntu Desktop, Server, and Netbook)
Additional ISOs and torrents are also available at:
http://uec-images.ubuntu.com/releases/10.10/ (Ubuntu Server for UEC and EC2)
http://releases.ubuntu.com/kubuntu/10.10/ (Kubuntu)
http://cdimage.ubuntu.com/xubuntu/releases/10.10/ (Xubuntu)
http://cdimage.ubuntu.com/edubuntu/releases/10.10/ (Edubuntu DVD)
http://cdimage.ubuntu.com/ubuntustudio/releases/10.10/ (Ubuntu Studio)
http://cdimage.ubuntu.com/ubuntu-netbook/ports/releases/10.10/ (Ubuntu ARM)
http://cdimage.ubuntu.com/mythbuntu/releases/10.10/ (Mythbuntu)
http://cdimage.ubuntu.com/kubuntu-mobile/releases/10.10/ (Kubuntu Mobile Preview)
http://cdimage.ubuntu.com/kubuntu-mobile/ports/releases/10.10/ (Kubuntu Mobile Preview ARM)
10/7/10
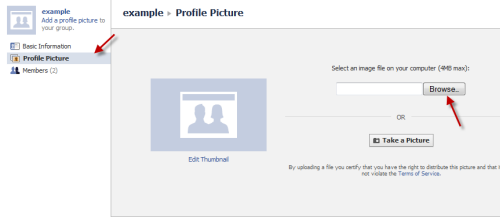
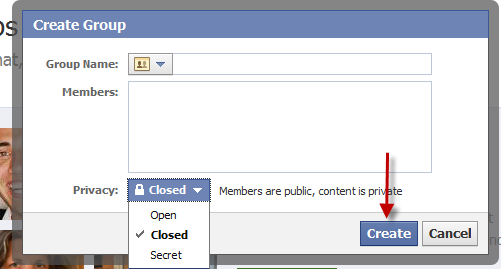
How to Create Groups and Use Them in Facebook
Facebook has just released a new feature called Groups. A Group is an area within Facebook where you can share information with a selected collection of invited people. For example, this would allow you to share family photos to your selected family group. These directions describe how to create a Facebook Group, invite users, and edit the picture associated with the group.
Facebook Groups will add another dimension to sharing on Facebook. By having small groups, you can share specific information such as pictures or videos with only certain people.
Maybe you have a school project and you want to share information with just those people involved. Just create a group and invite the friends who are working on that particular project.
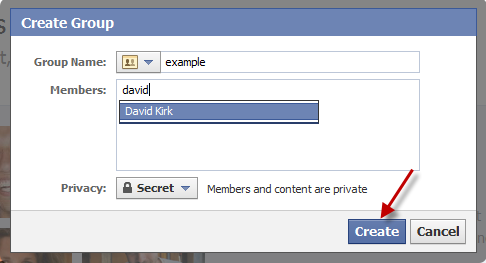
1. Go to Facebook Groups.
2. Log into your account.
3. Click on Create group.

4.Give your new group a name, add some members (you can also add members later), change the privacy and hit Create.
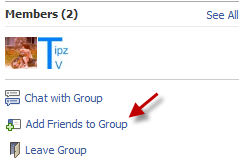
5. After the group has been created, you can always add new friends by clicking on Add friends to Groups.
6. You may also want to set the group’s picture. You can do it by clicking on Edit Group at the top.
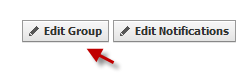
7. Switch to Profile Picture, click on Browse and point it to your profile picture.
10/6/10
Friend Groups and More Control Over Your Profile in Facebook
Today at an announcement at Facebook HQ broadcasted live, Mark Zuckerberg & team announced three pretty big updates to Facebook. These updates includes new Facebook Groups, Download Your Information, and the Apps That You Use Dashboard. Read on to find out more. This function allows you to export all of your data from Facebook in a zip file. This includes profile information, friends list, comments, photos, videos and more. Security is built into the application to ensure your data remains safe. Once it is downloaded, your profile is available in what looks like is a plain HTML/CSS format, which should make this information available to import into other social networks. This feature is perhaps a direct response to Facebook’s critics concerned about the platform being ‘closed’ with your data being locked with no way to export or back it up. Note: Once the feature rolls out to your account, all you need to do is head to Account > Account Settings > Download Your Information. From there, you can download a zip file containing all your profile information, including your photos, wall posts, messages, videos, friend lists, and other content. If you unzip the file, you can actually view a simple HTML page of your profile, with simple links to all of these things. This new feature allows you to have a finer-tuned access to how an external application will access your data. The granular controls give you the ability to enable and disable specific features like the ability to post to your wall, while allowing full access to other functions. A second part of this feature is an ‘audit log’ to see what exactly an App is doing with your data. This feature helps to mitigate the problem with having disparate groups of “friends”. It will aim to map real-world groups that share information to an area on Facebook which has similar features. Facebook has discovered that “people don’t want to make lists” quoting that only 5% of Facebook users made at least 1 list. But they also discovered that doing it algorithmically isn’t a great solution either, because who you interact with doesn’t necessarily indicate who you think should be in a certain group of friends. The new Groups aim to solve this by simplifying how you add friends to groups. Facebook hopes that making it as simple as tagging a photo will help to increase the adoption of creating separate lists of users. Groups is not replacing Lists (or old Groups), but is meant to augment small group communication. Think of it more like Google Wave functionality. Group features will include: The features will be rolled out over the next few days. If you don’t see it now, be patient, it should be there soon.Download Your Information

Apps That You Use Dashboard

Facebook Groups


10/4/10
10/3/10
10/2/10
9/28/10
How to read Ubuntu [Ext3/Ext4] partition from windows
The ext3 or third extended filesystem is a journaled file system that is commonly used by the Linux kernel. It is the default file system for many popular Linux distributions.
The ext4 or fourth extended filesystem is a journaling file system for Linux, developed as the successor to ext3.
The ext4 or fourth extended filesystem is a journaling file system for Linux, developed as the successor to ext3.
It was born as a series of backward compatible extensions to remove 64-bit storage limits and add other performance improvements to ext3.However, other Linux kernel developers opposed accepting extensions to ext3 for stability reasons and proposed to fork the source code of ext3, rename it as ext4, and do all the development there, without affecting the current ext3 users
Ext2Read is an explorer like utility to explore ext2/ext3/ext4 files. It now supports LVM2 and EXT4 extents. It can be used to view and copy files and folders. It can recursively copy entire folders. It can also be used to view and copy disk and file
You can download Ext2Read from here
Screenshot

Ext2Fsd is an ext2 file system driver for Windows 2000, XP, Vista. It’s a free software and everyone can distribute and modify it under GPL2.
Procedure o follow
Important Note:- When creating/formatting the ext4 filesystem, make sure to add “-O ^extent” which means disabling the “extent” feature bit. The following steps will not work if your ext4 filesystem still has “extent” feature enabled. ext2 and ext3 partitions should be fine.
First Download ext2fsd from here
Right-click the downloaded file and click Properties. Set the compatibility mode to “Windows Vista Service Pack 2? and check “Run as administrator”.
Run the ext2fsd installer. During install, we recommend you uncheck the “enable write access” feature to safeguard against losing data in your Linux partitions.
Restart your Windows 7 PC and run the Ext2 Volume Manager from Start Menu.
Important Note:- Use these tools with your own risk if you don’t use them properly it will remove your linux partition data
If you have any other tools to do this you share with me.
9/27/10

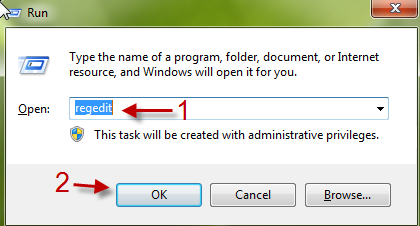
How To Put Text Files Directly into the Clipboard in Windows 7
Do you store clips of text in notepad? In Windows, I frequently use notepad to store small amounts of information. However, it can be a hassle to open the file, select the text, and then copy it into the clipboard. This guide will demonstrate how to copy a complete text file into the clipboard just using the right-click context menu.
1. Press Winkey R to open the Run box.
2. Type in Regedit and hit Enter to access Registry editor.
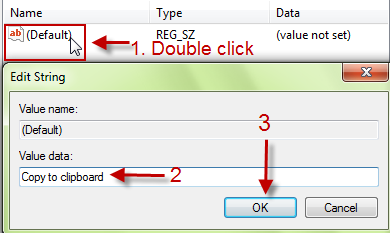
3. Go to HKEY_CLASSES_ROOT\textfile\shell, right click on Shell key and choose New->Key. Give your new key a name (example: Copy)

4. Double click on (Default) string value on the right pane, change its value data to something like “Copy to clipboard” (This text will appear in context menu) and hit OK to close the window.
5. Now, back to the left pane. Right click on the Copy key (or which one was created in step 3) and choose New->Key. Name your new key: command.

6. Double click on (Default) string (this is command’s value, not Copy’s value) and change the value to: cmd /c (Please change it manually. Don’t copy and paste this value, it will not work). Click on Ok to save.

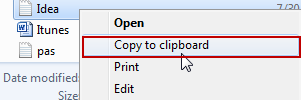
7. Close Registry editor. It may take effect immediately. If you don’t see Copy to clipboard from the context menu, please restart your system to take effect. From now on, you don’t need to open the file to copy its contents. Copying them from the context menu is MUCH faster! :)
9/16/10
9/15/10
RT @nirmaltv: RT @binoyxj: RT @compixels How to Unlock Huawei 2G/ 3G USB Data Modem [Free] http://bit.ly/c4hBme
9/13/10
9/10/10
9/2/10
“Points for Pakistan†Raises Awareness and Funds on Social Game and Virtual World Sites http://ping.fm/468jP
8/24/10
Fix Windows 7 Master Boot Record [MBR] after installing Linux
Repair MBR in Windows 7
First, insert your Windows 7 DVD into your DVD drive and restart your computer. You should get a message asking to press any key to boot from CD.

Note that this message will automatically come up if your boot order is set to CD/DVD drive first. If not, you will not get the message to press any key. In that case, you can read an article on how to change the boot order in the Windows BIOS.
Next, choose the Language, Time and Keyboard and then press Next. Usually, you do not have to change anything here.

On the next screen, you will see a link called Repair your computer at the bottom. Click on that.

System Recovery Options will now search for Windows 7 installations on your computer.

Once it finds it, go ahead and select your operating system and choose Next.

Now you will see the list of System Recovery Options, which include Startup Repair, System Restore, System Image Recovery, Windows Memory Diagnostic, and Command Prompt. In our case, we will choose Command Prompt since we have to run a command to fix the MBR.

At the command prompt, simply type in bootrec.exe /fixmbr and press Enter.

That’s it! Restart your computer and hopefully you will see the Windows logo instead of that horrible “Operating system not found” error message or no windows 7 at all.
Determine IP Address From a MAC Address
There are a couple of ways you can go about doing this. Firstly, it’s important to understand that the MAC address might not be the address for a PC. It could also be the MAC address for a printer or some other type of device on the network.
If you suspect the MAC address is a printer, first check out this site below to see if it matches a major manufacturer:
http://www.curreedy.com/stu/nic/
You can also find out if the MAC address is from a switch or other networking device from HP, CISCO, etc. If you’re sure the MAC address is a computer, then try the methods below to determine the IP address.
Method 1 – DHCP Server
The simplest way to get an IP address from a MAC address is to check out the DHCP server, if possible. Whether you are in a corporate environment or at home, each computer is being assigned an IP address from a DHCP server (unless it’s a static network, which is rare).
You can either go into the DHCP console on Windows Server 2003/2008 or you can log into your wireless router at home, if that is what you are using.

Simply go to Address Leases under the Scope and you can view both the client IP address and the Unique ID, which is the MAC address.
If you have a wireless router at home, it will vary depending on the brand (Belkin, Netgear, LinkSys, etc). But basically, there should be a section to view all the current devices connected to the wireless network.
On my AT&T U-Verse box, it’s right on the home page and I simply click on Device Details to view the MAC Address.

Method 2 – Ping Broadcast Address
The second way to do this if you can’t get access to your DHCP server is to use a useful command in Windows called ARP (Address Resolution Protocol).
Basically, you ping the broadcast address on your network from any Windows machine and then check out the ARP table afterwards.
If you subnet is 192.168.1.X with a mask of 255.255.255.0, then you would ping 192.168.1.255. When you ping, you will get a Request Timed Out all four times, but don’t worry.

Next, type in the following command
arp –a
You will now get a list of all the connected devices on your network along with their physical addresses! Pretty nifty trick.

Method 3 – Free Tools
Lastly, you can use a free program to get a IP address from a MAC address. It’s called CC Get MAC Address and it can be downloaded here:
http://www.youngzsoft.net/cc-get-mac-address/
Before you can use it, however, you need to scan all the IP addresses in your subnet in order for it to work. The program itself has a auto scan feature that takes in a IP range.
You can also use a free program called Advanced IP Scanner, which will do the same thing and is a program totally dedicated to scanning IP addresses:
http://www.radmin.com/products/utilities/ipscanner.php
You can also use the IP Scanner and then simply run the arp –a command to get a list of IP/MAC Addresses.
Subscribe to:
Posts (Atom)