4/30/10
10 things to do after installing Ubuntu 10.04 Lucid
 If you’re going to be installing a freshly minted copy of Ubuntu 10.04 LTS later today or this weekend then the following list of 10 reader submitted post-install must-do’s will help ensure that you’re off to a flying start with your new OS.
 1. Run Update Manager
Just because you’ve installed the latest version of Ubuntu doesn’t mean that there won't be some updates and patches waiting for you. Make sure you run the update manager (if it doesn’t update you first) so that you’re benefitting from the latest fixes and features.2. Enable graphics card drivers for 3D fun
If you want to use advanced desktop effects such as Compiz (3d Cube, wobbly windows) then you will need to enable the “official” drivers for your graphics card.
Ubuntu should automatically detect and alert you that 3D drivers are available. If so, you will see a ‘circuit board’ icon appear on the top panel. Click this and follow the prompts.
If Ubuntu fails to detect any hardware (do be patient as this isn’t always instant) then you can manually run the hardware configuration tool yourself from the System > Preferences menu.
3. Enable playback of MP3’s, MP4’s & more
It’s a shame this step has to be included at all but sadly Ubuntu aren’t allowed by law to ship certain multimedia codec's out of the box. Installing them yourself, thankfully, is a breeze – just click the button below!
4. Install more themes
Want a bigger selection of themes to choose between? You’ll find many beautiful and stylish ones in the Community Themes package.
5. Change font and/or font size
I know what you’re thinking: those fonts look huge, huh? Set them to a smaller size via the Appearance menu (Shortcut: Right click on Desktop > Change Background > Fonts).
Most readers find size 9pt works well but if you have a very wide display 8pt may suit you better.
If the default font isn’t to your taste a lot of readers suggested installing DroidSans.
Many users also recommend you install the Microsoft Core fonts package for better web browsing:
6. Set up UbuntuOne file sync
If you don’t already use UbuntuOne now is the perfect time to do so. You'll get 2 GB of free storage, you are able to sync your Firefox bookmarks, Tomboy notes and Evolution contacts between computers – as well as any file or folder you wish.
Head to Applications > Internet > UbuntuOne to get started.
7. Install Ubuntu Tweak and make your life easier
Ubuntu Tweak is a one-stop shop for managing and installing extra applications, tweaking your desktop (such as putting the window controls back on the right and choosing which icons show on the desktop) and allowing you to keep your system in tip-top shape with the built in system cleaning options. (Ubuntu tweak recently won our ‘Best System Cleaners’ poll by a landslide – and for good reason!)
8. Visit the Software Centre to find great apps
One size certainly does not fit all so if you’re wanting to add VLC, install Photoshop rival The GIMP or play some awesome games then look no further than the Ubuntu Software Centre which can be launched from the Applications menu.

Everything is one-click install so browse around – make sure you check out the featured applications section, too!
9. Download the Ubuntu Manual
The “Ubuntu Manual” (which is actually called ‘Getting Started with Ubuntu 10.04’ but Manual sounds cooler) is a fantastic source of information for both newcomers and those who consider themselves apt with Ubuntu.
It has a straight-forward and easily accessible style, lots of screenshots and step-by-step instructions how how to get the best out of Ubuntu 10.04 LTS.
10. Enjoy using it!
Forget about finding new apps or tweaking some part of Lucid for an hour or so and just use Ubuntu like anyone else would: Browse the net, chat on Empathy, type up that letter in Open Office and listen to something awesome in Rhythmbox.
Enjoy the awesomeness of Ubuntu 10.04 LTS as your survey your desktop like you are a king surveying your estate.
Go Green with Granola Energy saver - Linux & Windows
 Windows/Linux: Your computer's processor may be able to handle 3D shooters and complex rendering, but most of the time, you probably just need it to render Gmail. System utility Granola scales back your processor at such times to save energy and money.

Like any modern energy-saving utility, Granola offers both to-date cumulative stats on how much energy, money, and CO2 it's saved, and how much you can expect to save over a year's time, given current computer conditions. It needs a processor that's capable of scaling, along with that option to be enabled in the BIOS settings. What kind of savings should the average user expect? From Granola's FAQ page:
If you mostly surf the Internet and check email, the savings will be substantial and probably 30% or more. If you are playing the latest intensive graphic game without a high-end graphics card, the savings will probably be less; perhaps as low as 10%. But most likely, your system has many uses and the load varies with time. Our users typically experience savings of around 25%.
It's only the processor that Granola works on, and it would be a bit more convenient if it offered an easy on/off switch as a keyboard shortcut or from its system tray menu. Still, it's a neat addition to the many ways one can green their PC. It's a free download for Windows and Linux systems.
4/17/10
How To Integrate ClamAV Into PureFTPd For Virus Scanning On Debian Lenny | HowtoForge - Linux Howtos and Tutorials
This tutorial explains how you can integrate ClamAV into PureFTPd for virus scanning on a Debian Lenny system. In the end, whenever a file gets uploaded through PureFTPd, ClamAV will check the file and delete it if it is malware.
I do not issue any guarantee that this will work for you!
1 Preliminary Note
You should have a working PureFTPd setup on your Debian Lenny server, e.g. as shown in this tutorial: Virtual Hosting With PureFTPd And MySQL (Incl. Quota And Bandwidth Management) On Debian Lenny.
2 Installing ClamAV
ClamAV can be installed as follows:
aptitude install clamav clamav-daemon
3 Configuring PureFTPd
First we create the file /etc/pure-ftpd/conf/CallUploadScript which simply contains the string yes:
echo "yes" > /etc/pure-ftpd/conf/CallUploadScript
Next we create the file /etc/pure-ftpd/clamav_check.sh (which will call /usr/bin/clamdscan whenever a file is uploaded through PureFTPd)...
vi /etc/pure-ftpd/clamav_check.sh
#!/bin/sh /usr/bin/clamdscan --remove --quiet --no-summary "$1" |
... and make it executable:
chmod 755 /etc/pure-ftpd/clamav_check.sh
Now we edit /etc/default/pure-ftpd-common...
vi /etc/default/pure-ftpd-common
... and change the UPLOADSCRIPT line as follows:
[...] # UPLOADSCRIPT: if this is set and the daemon is run in standalone mode, # pure-uploadscript will also be run to spawn the program given below # for handling uploads. see /usr/share/doc/pure-ftpd/README.gz or # pure-uploadscript(8) # example: UPLOADSCRIPT=/usr/local/sbin/uploadhandler.pl UPLOADSCRIPT=/etc/pure-ftpd/clamav_check.sh [...] |
Finally we restart PureFTPd:
/etc/init.d/pure-ftpd-mysql restart
That's it! Now whenever someone tries to upload malware to your server through PureFTPd, the "bad" file(s) will be silently deleted.
4 Links
- PureFTPD: http://www.pureftpd.org/
- ClamAV: http://www.clamav.net/
- Debian: http://www.debian.org/
Use TeamViewer for remote Linux support now on Linux - Jack Wallen
Have you ever been asked to do any Linux desktop remote support only to find out the client didn’t have secure shell (so no tunneling of X) nor did they have a vnc server setup? In these cases, what would you do? You still need to be able to support that client. Or what if you had a Windows client that needed support and the only operating system you had available was a Linux box? In that case, you need TeamViewer. TeamViewer is an incredibly easy to use remote support tool that allows you to do more than many similar tools.
With TeamViewer you can remote control a session, record a session, do VoIP, switch sides with client, and more. It truly is one of the finest free remote support tools you will find. In this article I will show you how to install and use TeamViewer on a Linux machine.
Getting and Installing
For the purposes of this article, I will show you how to install TeamViewer on a Ubuntu 10.4 installation. This install is simple if you follow these steps:
- Open up your web browser and point it to the Download Page.
- Download the .deb file that matches your architecture (32 or 64 bit).
- Allow GDebi to install the software automatically.
Once installed, you will find TeamViewer in Applications > Internet > TeamViewer.
Using TeamViewer
The use of this software requires it to be installed on both client machines. If you are doing support, that means you will have to walk your client through the installation of TeamViewer on their machines. Once they have the software installed here are the steps to using TeamViewer:
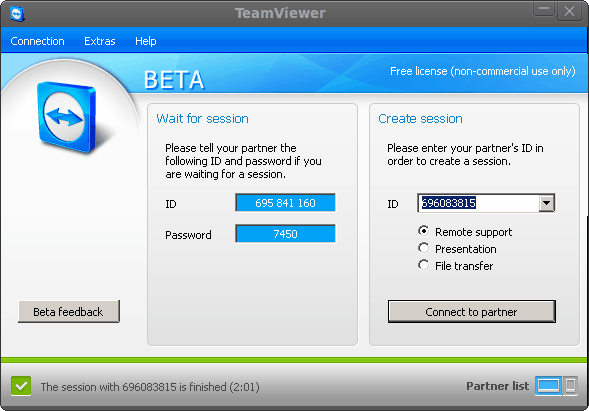
Figure 1
- Start up TeamViewer on both ends.
- From the Client side (non-support side) record the ID and Password as shown on the Session window (see Figure 1).
- On the Support side enter the ID from the client window in the ID section of the Create Session side.
- Click Connect to partner.
- In the Authentication window enter the password shown and click Log On

Figure 2
Once you connect a new window will open with your connection to your client (see Figure 2).
What is really nice about TeamViewer is that it doesn’t matter if you are using Linux on the client side or support side – it will connect and you will be able to remotely manage the machine. You do not need to install any extra widget sets or anything out of the ordinary. They will simply connect.
Extra features
If you look at the drop-down bar at the top of Figure 2 you will notice a few buttons. These buttons offer a number of extra features such as:
- Actions: Remote reboot, Send Ctrl-Alt-Del to the client, switch sides
- View: Change the quality of your remote display
- Audio/Video: Use VoIP
- File Transfer: Transfer files between machines.
- Extras: Record a session, start VPN connection, do a remote update
When you want to end a session all you have to do is click the red X in the upper toolbar.
Final thoughts
TeamViewer is an outstanding tool to be used for remote support. You will be hard pressed to find a tool that can cross platforms as easily.
Backup And Restore Windows Driver With Double Driver
The driver backup and restoration software Double Driver was recently updated to version 4, reason enough for us to take another look at the software program (see on ghacks Backup and Restore Drivers). Double Driver can scan a system for drivers that can then be backed up by the user to be able to restore them at a later point. This can be handy before installing a new operating system or reinstalling the old one.
Double Driver 4.0 comes with a new interface that makes use of Windows Aero. It will automatically recognize if the program has been started by a user or administrator of the system. The available options differ depending on that.

The options that the program provides are accessible in the program’s header. Here it is possible to backup and restore drivers or save and print the driver list.
A click on the Backup links opens the driver backup page. The user can start a driver scan on the current system or on another system which is a new feature in Double Driver 4. The screen will then be populated by a list of drivers that the program found on the target computer. Drivers are listed with their name, provider, version, date and class among other information.
Checkboxes are provided to select the drivers to backup. Double Driver seems to automatically select all drivers that are not standard Windows drivers so that these can be backed up with a click on Backup Now. The Select link in the top navigation menu can be used to quickly select all drivers, invert the selection or select none for a fresh start.
The backup now button leads to a new window where the destination directory for the driver backups and the output format can be configured. Supported are structured folders, compressed folders or single self extracting files.

The restore button can then be used at a later time to restore a previously created backup. The single self extracting files install the drivers on the target system without Double Driver while the two other options require Double Driver to do so.
Double Driver 4.0 is a portable software program for the Windows operating system that can be used to efficiently backup and restore system drivers. The program is compatible with 32-bit and 64-bit editions of the Windows operating system.
How to encrypt and decrypt a file in Linux, password protected | Linux Operating System - Debian, Ubuntu, Fedora, Gentoo, Arch
Security is important, we all know, and to protect files in Linux Operating System machines is really easy.
The files can be password protected, so you can carry them in a flash memory, and if you loose the flash, you do not have to worry about your info, as it will not be readable.
To encrypt a file in Linux we will use, gpg which is parte of the GnuPG.
Syntax of gpg
gpg -c filename.ext
Let's imagine we have a file called my-personal-info.txt
I want to encrypt with a password to protect the file, run this command.
gpg -c my-personal-info.txt
The output of the command is:
$ gpg -c my-personal-info.txt Enter passphrase:
Enter a good passphrase, be sure to remember it, and do not use an easy one.
Then you will get
Repeat passphrase:
Now gpg has created an encrypted file called my-personal-info.txt.gpg, the original file is still there, so you may want to erase it, or only transport the encrypted one, or send by email the encrypted one.
To decrypt a file just enter this command.
gpg my-personal-info.txt.gpg
You will be asked for the password or passphrase, and the file will be recreated.
Protect your data.
4/16/10
Universal USB Installer – Easy as 1 2 3
Universal USB Installer is a Live Linux USB Creator that allows you to choose from a selection of Linux Distributions to put on your USB Flash Drive. The Universal USB Installer is easy to use. Simply choose a Live Linux Distribution, the ISO file, your Flash Drive and, Click Install. Other features include; Persistence (if available), and the ability to format the flash drive (recommended) to ensure a clean install. Upon completion, you should have a ready to run bootable USB Flash Drive with your select Linux version installed.
Universal USB Installer Screenshot

")
![]()
Download Universal USB Installer
Currently USB Installable Live Linux Distributions- Ubuntu 9.10 Desktop i386 – Site
- Xubuntu 9.10 Desktop i386 – Site
- Kubuntu 9.10 Desktop i386 – Site
- Ubuntu Rescue Remix Revision 1 – Site
- Ubuntu NetBook Remix 9.10 – Site
- Ubuntu Server 9.10 32bit/64bit Installer – Site
- Linux Mint 8 – Site
- YlmF OS V1.0 – Site
- Crunchbang 9.04 – Site
- KNOPPIX V6.2 – Site
- gOS 3.1 gadgets – Site
- Ultimate Boot CD V4.11 – Site
- Gentoo 10.1 – Site
- xPUD 0.9.2 – Site
- Simply MEPIS 8.0.15 – Site
- RIP Linux 9.3 – Site
- EEEBuntu 3.0 (Netbook Distro) – Site
- PartedMagic 4.8 – Site
- DSL (Damn Small Linux) 4.4.9 – Site
- EasyPeasy 1.5 (NetBook Distro) – Site
- DBAN (Hard Disk Nuker) – Site
- Puppy Linux 4.3.1 – Site
- Puppy Arcade 7 (Console Game Emulator) – Site
- Kiwi Linux 9.04 – Site
- SLAX 6.1.2 – Site
- SliTaZ Cooking – Site
- Ophcrack XP – Site
- Clonezilla – Site
- Jolicloud (NetBook Distro) – Site
- Dynebolic 2.5.2 DHORUBA – Site
- PLoP Linux 4.0.5 (a minimalist Linux Rescue System) – Site
More Live Linux Distributions will be added as time permits.
Notes: If you run Universal USB Installer from the same directory containing an installable ISO, the script will autodetect the ISO and bypass step 2 once the proper Distro has been selected.

Currently this tool does not support installing and booting from multiple Linux Distributions. Only One Distribution can be installed at any given point in time. A multiboot feature may be added in the future.
4/11/10
Confusing joke rug
This picture is driving me mad since all I want to do is pull that rug out from under the wall. Only the rest of it just isn’t there. It’s a nice trick to play on unsuspecting visitors, especially moms.
Perfect for pushing your obsessive girlfriend (or guy) over the edge, especially if you glue it to the floor properly. Just be careful they don’t rip that radiator out from under the window in their rage and crush you with it.

4/10/10
Learning GNU Text Utilities by Joe Zonker
A few weeks ago we looked at some of the GNU utilities that you can use to work with files, check MD5/SHA1 sums and check your disk usage. This time around I want to cover some of the utilities that you'll use for working with text files.
Why text files, specifically? Well, if you're doing much work at the shell on Linux, you'll start encountering a lot of text or files that can behave like text. Log files, configuration files and output from many commands can all be manipulated with the GNU textutils.
At one time, the GNU textutils were broken out into their own package, but a few years ago they were merged into the GNU coreutils. But for convenience sake, I'm going to keep the old moniker because that's a handy way of thinking about those tools.
Assuming you're running any of the major Linux distros and have a default installation, you should have the GNU coreutils package installed already. Some minimalist Linux distros ship Busybox instead. If that's the case, you may have some versions of the tools we're discussing here installed, but they may not have all of the same options as the GNU textutils. Both Busybox and the GNU textutils are actually implementations of tools that were initially developed for proprietary UNIX.
Some of the utilities are more useful than others today, so I'm going to focus on the utilities that are most likely to be useful to you. For instance, the base64 utility for converting in/out of base64 isn't something I've had any call to use in the last 10 years. But fmt, nl and uniq still prove useful on a regular basis.
A few have been covered in the previous GNU tutorial as well. Specifically, md5sum, head and tail, so please go back and check the Getting to Gno GNU Utilities tutorial if you need to brush up on those.
Understanding cat and tac
The cat utility is short for "concatenate." I think we can all agree it was wise to trim that one down a bit. OK, but what does it mean? Basically, cat will take a file or standard input and send it to standard output. If you don't redirect the output from cat it will print to the terminal, or you can use one of the redirectors and send the output to a file or another utility.
You can also use cat to join files to work on them together. For instance, if you want to process a couple of logfiles at once, you could use something like:
cat filename1 filename2 | sort
The tac command is basically just cat backwards. This might be useful if you want to process a logfile from the newest entries to the oldest.
Some purists will note that cat is overused when simple file redirection would do. For example, you'll often see something like this:
cat filename | sort
What's happening there is using cat to pipe (|) to sort. Actually, you can do the same thing by running sort < names and save yourself a bit of typing. However, do whatever works best for you.
Formatting Files
Many of the textutils are dedicated to formatting text for printing. Few folks are dealing with line printers and using CLI tools to send to printers these days (though not an obsolete art, to be sure), but you may still find these tools useful in many situations.
The fmt command will reformat text for writing to standard out or another file. This is primarily used to reflow text to a default column width. Say you want to reflow a text file so each line is only 72 characters: You can do this easily with fmt like so:
fmt -w72 filename.txt
This will only break lines on whitespace characters: It won't break a whole string (word or other non-broken set of characters) unless it's longer than 72 characters.
The cut utility will remove sections from a file. So if you want to deal with only a section of a logfile, for instance, you can use the cut utility to chop out only the bits that you want to work with. The cut utility works on each line. So, given input like this:
[Sun Mar 21 16:36:21 2010] [error] [client 69.72.214.138] File does not exist: /var/www/components [Sun Mar 21 17:24:42 2010] [error] [client 78.110.50.111] File does not exist: /var/www/joomla [Sun Mar 21 17:37:15 2010] [error] [client 174.36.241.157] script '/var/www/index.php' not found or unable to stat [Sun Mar 21 18:06:59 2010] [error] [client 38.111.147.83] File does not exist: /var/www/robots.txt
...you can use cut to separate individual fields. So if you only want to work with, say, the IP address or the error message, you can use cut.
Need to trim a file by lines instead? The split utility will take a logfile or other text file and output it to smaller files. The default is to take the input and spit out files of 1,000 lines each. Unless specified, the files will be named "xaa," "xab" and so on until split finishes the file or runs out of suffixes.
Why would you want to do this? One reason is to make it easier to work with logfiles, break them down into smaller chunks for archiving or processing.
Finding Unique Entries with uniq
When you're wading through logfiles or processing other text files, you'll often have files with a lot of similar entries. If you want to winnow those down to unique entries, uniq is the tool to reach for. Let's start with a simple example, like a text file of 1,000 email addresses. You know you have duplicates but don't feel like sorting through the file by hand and probably wouldn't spot all the duplicates anyway. No problem; just filter the list using uniq:
uniq < emails.txt
The uniq utility will omit duplicates. If you want to see how many times you have duplicate lines, use the -c option to count the number of times a line appears.
But wait. You notice that some lines may be duplicates after all! That's because uniq looks for two (or more) lines together. If you have duplicate lines that are separately listed, they'll be missed. Unless you combine uniq with another GNU textutil: sort.
Sort It Out With sort
The sort utility does just what you'd expect: It takes input and sorts it according to the criteria you give it. The default is to sort by "dictionary" order, but it can also sort by numeric value, in reverse order, etc. See the man page for the full range of options, but rest assured if there's a way you want to sort a file the option probably exists.
Here's how we'd combine sort and uniq to get rid of those pesky duplicates:
sort emails.txt | uniq > sorted_emails.txt
Pretty easy, right? You simply pipe the output from sort to uniq. By chaining the commands, we can start doing some really useful work.
Putting Them Together
Individually, the textutils are useful but you might be wondering what the big deal is. You can't do a lot with cat or uniq individually. But when you start chaining the commands, you can do some pretty powerful stuff.
Let's say you want a report of all the unique IP addresses that have appeared in a log file in the last day or so. We're going to use cut, sort and uniq to get all the unique IP addresses. As an added bonus, we'll throw in nl, a utility that will number lines for you:
cut -d ' ' -f 8 error.log | sort -n | uniq | nl
This takes the file error.log, and runs it through cut first. The options to cut tell the utility to use the space character as a delimiter (-d ' ') and to only spit out the 8th field (-f 8) from the file. So if you look at the file, the IP address is the 8th field if you count the fields separated (delimited) by spaces.
Then it runs that through sort to sort the IP addresses numerically (-n). Then, it removes duplicate IP addresses. Finally, it runs the result through nl to give a count.
That will produce output like this:
1 4.20.98.115] 2 4.79.205.35] 3 12.10.235.174] 4 12.102.9.44] 5 12.106.89.75] 6 12.111.52.254] 7 12.111.74.5] 8 12.132.106.130] 9 12.14.59.66] 10 12.149.50.2]
Good, but not great just yet. I don't like the trailing bracket. So let's throw in a bonus utility, sed, which is a stream editor:
cut -d ' ' -f 8 error.log | sort -n | uniq | sed s/']'// | nl
Now you'll get the same result, but without the annoying end bracket. The sed command simply uses a search and replace. If you followed the Vim 101 beginner's guide a few months ago, that should look familiar. The s/ starts the search, and then ']' tells sed to look for a closing bracket. Why did I use the single quotes? Because the Bash shell treats ] as a special character. Putting it in single quotes tells the shell to treat it literally (i.e., not to interpret it). Finally, the closing // tell sed to replace the bracket with nothing.
Once again, this really only scrapes the surface of what the GNU utils can do. But I hope it's given you a rough guide to how you can use the GNU textutils and how they can be useful to you. In future tutorials, we'll take a look in more depth at sed if there's interest, let me know in the comments! In the meantime, take a little while to familiarize yourself with the GNU utilities. You'll find that it's very well worth it!
LinuxCommand.org: Learn the Linux command line. Write shell scripts.
The Linux® Command Line
A New Book By William E. Shotts, Jr.
Designed for the new command line user, this 522 page volume covers the same material as LinuxCommand.org but in much greater detail. In addition to the basics of command line use and shell scripting, The Linux Command Line includes chapters on many common programs used on the command line, as well as more advanced topics.
Released under a Creative Commons license, this book is available for free download in PDF format. Download it here.
The book is also available printed, in a large, easy-to-read format. Copies may be purchased at lulu.com. Proceeds help support LinuxCommand.org.
via linuxcommand.org
4/8/10
4/7/10
Get to know Linux: File permissions
Have you ever attempted to do something with a file on a Linux machine and been given the error “permission denied”? For some people this isn’t a problem, either su to the root user or use the sudo command to help you along. For some users, however, this can be very frustrating. Why? When you don’t understand file permissions, using and (especially) administering a Linux system can be a real pain. Even though you can read an extended listing of a file and see drwxr–r–, if you don’t know what that means (or how to manipulate it) what good is that extended listing? And what good is that file if you can’t access it (when you need to or should be able to)?
In this article I will introduce you to Linux file permissions and how to manipulate them. I will show you how to manipulate permissions from both the command line as well as the GNOME gui Nautilus.
Breaking down the permissions
When you do a long list (ls -l ) in a directory you will see listings like:
drwxr-xr-x jlwallen jlwallen 12288 2009-12-22 16:26 Documents
What we want to concentrate on right now is the first bit, drwxr-xr-x. This string of characters lists the full permissions of the file or directory. It is also important to know the next two strings (in this case both are jlwallen) are the user and group associated with the file.
Let’s go back to the permissions string. The first character, d, means the listing is a directory. Now, instead of looking at the next portion of the string as a single group, think of it as three groups:
- rwx
- r-x
- r-x
The first set of three characters in a permissions listing always marks the permissions of the owner of the file (in this case, jlwallen). The letter o is associated with owner. The next set of three marks the permissions of all users that belong to the group associated with the file (in this case, again, it’s jlwallen). The letter g is associated with group. The final set of three characters marks the permissions of everyone else. The letter u is associated with others.
Now let’s break down the components of the permission string:
- r – read permission
- w – write permission
- x – executable permission
Changing permissions
Let’s say you have a file, test, that is a script that needs to be executed. The default ownership of this file is:
-rw-rw—-
Now let’s say you want both the owner (in this case jlwallen) and anyone belonging to the group (in this case jlwallen) to be able to execute this script. Remember, execute is x and you want to give x permission to o and g. To do this you use the chmod command like so:
chmod og+x test
The above command would add executable permission to owner and group. The new listing would look like:
-rwxrwx—
Now both the owner and anyone belonging to the group jlwallen can execute this script.
The GUI way
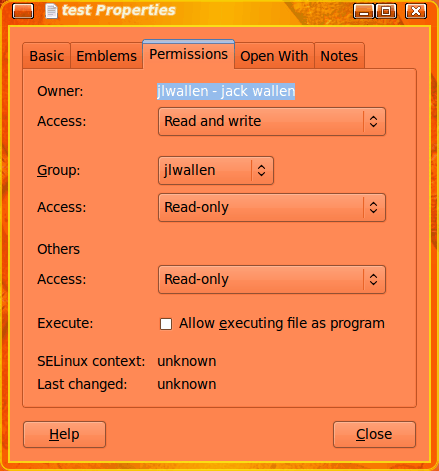
Figure 1
You can change permissions of a file with the help of the Nautilus file manager. Open up the file manager and navigate to where you have the test file saved. Right click the icon of that file (or listing if you are not in icon view mode) and select Permissions. From within this new window click on the Permissions tab (see Figure 1).
As you can see, changing permissions for this file is just a matter of selecting the necessary entry from the Access drop-down associated with either Owner, Group, or Others. However, you will notice that these drop-downs only have two entries: Read or Read and Write. In the case of our test file we would want to check the “Allow executing file as program” checkbox to make this file executable. The only drawback to this method is you can not specify who has execute permissions. If you mark a file executable it will be so for all.
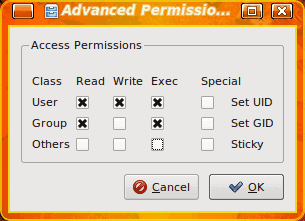
Figure 2
With the KDE file manager, Dolphin, you can get a bit more fine grain with your permissions. When you right click a file in Dolphin select Properties and then click on the Permissions tab. In this tab is an Advanced Permissions button. Click that and a smaller window will open (see Figure 2) where you can select precisely what each class (owner, group, other) has what permissions. Make your choices and click OK.
Final thoughts
Although the GUI tools are helpful for the new users, having real control over file permissions should be handled through the command line. But for those who absolutely do not want to use the command line, there are options for you. You will certainly want to get familiar with permissions. Knowing how to navigate file permissions will save you a lot of time and hassle when using the Linux operating system.
4/6/10
Setting the record straight on sudo | Linux and Open Source
I recently read a blog posting that denounced the use of sudo as insecure because of the following (briefly summed up and paraphrased) reasons:
1. The idea that not using the root account is wrong, using root for everything is fine.
2. That using sudo for everything provides a false sense of security over performing an action as root directly
3. That using a user account password to get a root shell is a bad idea
4. That using a root shell is not dangerous, and that this “grave misunderstanding” came from the idea that running X as root is dangerous
5. That sudo has very little place in the Enterprise
6. That relying on sudo is foolish, because it has bugs
7. That everything should be done from a root shell, and that you should have to know the “uber-secret root password” to get that access
My first reaction to this blog posting was that the author had no idea how to use sudo properly or why you would want to. My second reaction was to give a big thank you to Ubuntu and OS X that, by default, provide a password-less root account and give administrators sudo access to everything, which pretty much leads to these kinds of silly anti-sudo articles.
To begin with, there is nothing wrong with using the root account if it is your system or you’re the administrator. Secondly, using sudo instead of a root shell is not more insecure. That’s simply ludicrous. The only difference is that with one you require knowing root’s password, and with the other you need to know your own password. If you are in the habit of using poor passwords, yes, this could bite you — but if you are already in the habit of using poor passwords, what’s to say that the root password isn’t just as bad?
And with systems like Ubuntu or OS X, where you don’t have a defined root password, you don’t have a choice but to use sudo (or to create the root password yourself but, in the end, the insecurity in all of this isn’t the software, it’s the end user coming up with poor passwords).
And the reason that people are very much discouraged from using X as root is because if you have a full GUI session as root, chances are you will fire up a browser, or an email client, or some other program that can have devastating effects on the system if compromised. This just makes sense. Running Firefox as an unprivileged user is a million times safer than running it as root, largely because those programs interact with untrusted data all the time.
As for the claim that sudo has no place in the enterprise because it has bugs, that is foolish as well. All software has bugs — sudo is no exception. Why not a bug in su? Or PolicyKit? Or SELinux? By that argument, no software should be trusted at all. As for the enterprise, sudo is almost a necessity in the enterprise because it provides logging so you can audit which user did what, and when. For instance, using sudo /etc/init.d/httpd status yields the following syslog entries:
Mar 13 21:03:13 hades sudo: joe : TTY=pts/2 ; PWD=/home/joe ; USER=root ; COMMAND=/etc/init.d/httpd status
whereas with su, using su root -c /etc/init.d/httpd status:
Mar 13 21:04:25 hades su: pam_unix(su:session): session opened for user root by joe(uid=1001)
Mar 13 21:04:25 hades su: pam_unix(su:session): session closed for user root
The difference should be obvious. With sudo, we clearly know what joe did, when, and with what user privileges. With su, all we know is that joe opened a root session. Was it to run a root shell? Execute a command? If so, which command? There is absolutely no auditable information here at all. With sudo, and the ability to tightly delegate commands, you do not have to provide full, unfettered access to the system; you can provide access to exactly what they need. If joe only needs to be able to manage Apache, he does not need full system access as root, to do anything he wants. How this is supposedly more insecure, I have no idea.
Finally, the assumption that you have to use your own password with sudo is wrong again. You can tell sudo to authenticate against a particular user’s password instead, by adding to /etc/sudoers the following:
Defaults timestamp_timeout=0,rootpw
Now sudo will always ask for a password, and it will always be root’s password.
I really have a problem with the blanket assumptions people make about sudo, especially when they are wrong. Used correctly, it is a fantastic tool. Yes, it has had security problems in the past, but they have always been dealt with quickly (by both the upstream kernel and the Linux vendors providing it). Yes, Ubuntu and OS X use it in a very poor fashion, but their defaults are not sudo defaults.
Unfortunately, they have to use sudo in this fashion because the root users don’t get passwords by default. Without configuring sudo as they do, no one would get root privileges on these systems, even those that should have it.
It would be nice if people ranted about things that deserved it: sudo is just a tool, and it is very good at what it does. It is essential in the enterprise where PCI-DSS compliance is required, or any kind of auditing or logging is desired. The problem is when people don’t bother reading about its features or think that the defaults provided by one or two operating systems is “the norm” for sudo. It isn’t, and sudo shouldn’t bear the brunt of the criticism: poor configurations of sudo should.
Five open source alternatives to the iPad
Image credits: Touch Book from Always Innovating (alwaysinnovating.com)Interest in iPad app development is waning, and the device just got here. Maybe that means it's time to explore more open options. Here are five.
Neofonie WePad
A bit bigger than the iPad with an 11.6", 1366x768 display, the WePad runs the Android OS. You can get apps from the Android Market or the WePad App Store. It also has a 1.3 megapixel webcam, which the iPad infamously did not include. What about the other iPad holes most often complained about? Flash? Yes. Multitasking? Yes. And the USB ports, modem, and 6-hour battery life won't hear many complaints either.Touch Book
Touch Book is sort of a netbook, sort of a tablet. It's made by a company called Always Innovating, and it has a feature that really appeals to me--a detachable keyboard dock. Their website shows its many with-or-without-dock configurations with titles like "Yoga: Downward dog," "Separation under way," and my favorite, "Fridge magnet." The hardware and software are fully open source--ready for you to do with what you like. It comes with a custom operating system, but you can install any mobile OS you like. Take a look at it at Gizmodo.iFreeTablet
A 2-pound tablet for 300-400€ with a Linux OS designed specifically for a touchscreen with usability in mind. That's the completely open source iFreeTablet developed at the University of Cordoba in Spain. And you get the Flash support and multitasking you can only dream of with that shiny iPad. It's biggest shortcoming is the mere 2.5 hour battery life.Tablets from Taiwan
According to PCWorld, Taiwanese gadget makers are ready to show off at least 10 iPad competitors. Here are two that were also shown at CES:
- MSI has a 10" Android tablet. They're still a little short on details, other than the fact that they use the new Tegra 2 chips.
- The Asustek Eee Pad also has a 10" touchscreen and the Tegra 2 chips. It's expected to come with the Chrome OS.
Google tablet
This one's cheating a bit--Google has no official plans to release a tablet. But there has been consideration of what the Chrome OS would look like on a tablet. And that gets the speculation started. ReadWriteWeb has explored the idea more in-depth.
Features comparison
WePad Touch Book iFreeTablet iPad Weight 1.75 pounds <2 pounds 2.27 pounds 1.5 pounds Display 11.6", 1366x768 8.9", 1024x600 10.2" 9.7", 1024x768 CPU Intem Atom N450, 1.6 Ghz OMAP2530, 600 MHz Atom N270, 1.6 GHz Apple A4, 1 GHz Battery 6 hours 3-5 hours tablet, 10-15 hours with keyboard, replaceable by user 2.5 hours (planning to improve) 10 hours Keyboard no yes no no Camera 1.3 MP no 1.3 MP no USB 2 3 external, 4 internal 3 none Storage 16 GB, extendable to 32 GB 8 GB removable SD card 160 GB 16, 32, or 64 GB RAM 2 GB 512 MB + 256 NAND ? 256 MB OS Android Linux, Android, soon Chrome, other options SIeSTA (based on Debian) iPhone OS Wi-fi 802.11 b/g/n 802.11 b/g/n 802.11 b/g 802.11 a/b/g/n Price not yet for sale $299 tablet, $399 with keyboard not yet for sale--estimated 300-400 Euro (~$400-$550) $499-$829 Ready to say no to the definitely closed iPad? Which of these alternatives sounds best to you?
")
via opensource.com
4/5/10
Google runs Quake in a browser using HTML5
By Brad Sams
In the near future, HTML5 compliance will become standard across many web pages. Up until now, many have wondered if HTML5 truly has the power to knock Adobe’s Flash off of its perch; Google has shown us that it does.
In an interesting twist, Google has shown off how HTML5 can run the first person shooter, Quake, in a browser. The reason this is an interesting twist is because Google announced that Chrome would come bundled with Flash.
According to TechCrunch, Google “started with the existing Jake2 Java port of the Quake II engine, then used the Google Web Toolkit (along with WebGL, WebSockets, and a lot of refactoring) to cross-compile it into Javascript. You can see the results in the video above — we were honestly a bit surprised when we saw it pushing over 30 frames per second on our laptops (your mileage may vary)! “.
You can try out the port by visiting the Google code page. As of right now, the only supported browsers are Safari and Chrome, but expect IE 9 and others to be compliant in the near future.
A few Ubuntu “power user” tips test it
I thought I would start off the month with a collection of “power user” tips I have collected over the years. Some of these are real gems, some of them are just “been there, done that”. But all of them are useful.
So, without further adieu, let’s get to the tippage!
Global keyboard shortcuts
We all know that keeping your fingers on the keyboard makes for much more efficient computing. But did you know you can create global keyboard shortcuts for GNOME? This is done with the help of the gconf-editor tool. Here’s how it’s done:
Remember your state
- Hit <Ctrl>F2
- Enter gconf-editor to start up the tool.
- Navigate to Apps > Metacity > keybinding_commands.
- Right-click in the pane that lists all of the entries.
- Scroll until you see a list of command_N Where N is a number from 1-10
- Double click on one of these entries (remember which number you double clicked on).
- In the Value section enter the command you want to use.
- Click OK.
- Navigate to Apps > Metacity > global_keybindings.
- In the Value field enter the key combination you want to use for that app (for example <Alt>f for firefox).
- Click OK.
- Test out your short cut.
Did you know you can have GNOME remember everything you have open when you next log in? This way you can resume working in the same state you were when you left. To do this navigate to System > Preferences > Startup Applications. In this new window click on the Options tab and check the box for “Automatically remember running applications when logging out”.
Now the next time you log out and log in, your apps will be there for you.
Speed up boot time with profiling
Ubuntu 10.4 has reached the 10 second mark for boot time. But what if yours isn’t quite reaching that goal? You can speed this up using the profile option. To do this follow these steps:
The firs time you boot with profile it will take a little longer. What this is doing is profiling your boot process so it knows what files are accessed and then sorts them according to how they are stored on your drive. Your next boot should be considerably faster.
- At your boot screen press “e” (for edit).
- Use your arrow key and move down to the entry beginning with “kernel”.
- Press “e” again.
- Add “profile” (no quotes) at the end of this line.
- Hit Enter.
- Click “b” (for boot).
Remove menu delay
If you are like me, you want menus to pop up instantly. By default there is a slight delay for menus. To change this follow these steps:
You should now notice no delay in your menu popup speed.
- Open up a terminal window.
- Enter nano ~/.gtkrc-2.0
- Add a single line gtk-menu-popup-delay = 0
- Save that file
- Log out and log in.
Speed it up with no effects
If you find your GNOME desktop to be a bit sluggish, you might gain some speed by disabling special effects. To do this navigate to System > Preferences > Appearance. In this new window click on the Visual Effects tab and select None. This will boost your dekstop performance.
Final thoughts
And there you have it. Starting out your April with some “power user” tips. I have tons of tips just like this so expect them to be scattered about. Next time we’ll take a look at some KDE power tips.
via ghacks.net
Subscribe to:
Comments (Atom)