9/28/10

How to read Ubuntu [Ext3/Ext4] partition from windows


The ext3 or third extended filesystem is a journaled file system that is commonly used by the Linux kernel. It is the default file system for many popular Linux distributions.

The ext4 or fourth extended filesystem is a journaling file system for Linux, developed as the successor to ext3.

It was born as a series of backward compatible extensions to remove 64-bit storage limits and add other performance improvements to ext3.However, other Linux kernel developers opposed accepting extensions to ext3 for stability reasons and proposed to fork the source code of ext3, rename it as ext4, and do all the development there, without affecting the current ext3 users

Ext2Read is an explorer like utility to explore ext2/ext3/ext4 files. It now supports LVM2 and EXT4 extents. It can be used to view and copy files and folders. It can recursively copy entire folders. It can also be used to view and copy disk and file

You can download Ext2Read from here

Screenshot

Ext2Fsd is an ext2 file system driver for Windows 2000,  XP, Vista. It’s a free software and everyone can distribute and modify it under GPL2.

Procedure o follow

Important Note:- When creating/formatting the ext4 filesystem, make sure to add “-O ^extent” which means disabling the “extent” feature bit. The following steps will not work if your ext4 filesystem still has “extent” feature enabled. ext2 and ext3 partitions should be fine.

First Download ext2fsd from here

Right-click the downloaded file and click Properties. Set the compatibility mode to “Windows Vista Service Pack 2? and check “Run as administrator”.

Run the ext2fsd installer. During install, we recommend you uncheck the “enable write access” feature to safeguard against losing data in your Linux partitions.

Restart your Windows 7 PC and run the Ext2 Volume Manager from Start Menu.

Important Note:- Use these tools with your own risk if you don’t use them properly it will remove your linux partition data

If you have any other tools to do this you share with me.

Posted via email from BitHacker's Posterous

9/27/10

To Date or Not to Date! Here's a Flow Chart to Help You :)


How To Put Text Files Directly into the Clipboard in Windows 7


Do you store clips of text in notepad? In Windows, I frequently use notepad to store small amounts of information. However, it can be a hassle to open the file, select the text, and then copy it into the clipboard. This guide will demonstrate how to copy a complete text file into the clipboard just using the right-click context menu.

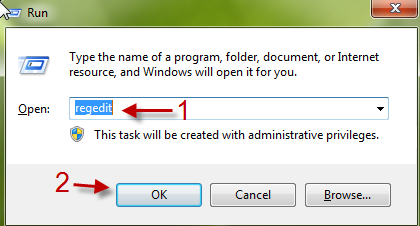
1. Press Winkey R to open the Run box.

2. Type in Regedit and hit Enter to access Registry editor.

3. Go to HKEY_CLASSES_ROOT\textfile\shell, right click on Shell key and choose New->Key. Give your new key a name (example: Copy)

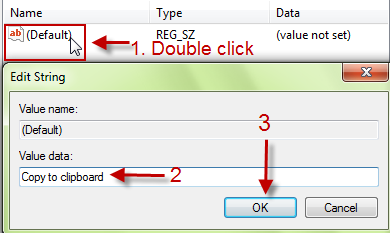
4. Double click on (Default) string value on the right pane, change its value data to something like “Copy to clipboard” (This text will appear in context menu) and hit OK to close the window.

5. Now, back to the left pane. Right click on the Copy key (or which one was created in step 3) and choose New->Key. Name your new key: command.

6. Double click on (Default) string (this is command’s value, not Copy’s value) and change the value to: cmd /c (Please change it manually. Don’t copy and paste this value, it will not work). Click on Ok to save.

7. Close Registry editor. It may take effect immediately. If you don’t see Copy to clipboard from the context menu, please restart your system to take effect. From now on, you don’t need to open the file to copy its contents. Copying them from the context menu is MUCH faster! :)

Posted via email from BitHacker's Posterous

9/16/10


RT @dkarbassiyoon: Twitter recommends I follow Kanye West and Taylor Swift. At least this proves Twitter shows no bias.

A relationship/friendship built upon lies is not built to last.

9/15/10


RT @nirmaltv: RT @binoyxj: RT @compixels How to Unlock Huawei 2G/ 3G USB Data Modem [Free] http://bit.ly/c4hBme

9/13/10


listen to your heart,
those angel faces,
they'll see you to you,
they'll be your guide,
back home where life leaves us blind,
love keeps us kind,
it keeps us kind!

9/10/10

9/2/10


Woman Sues Facebook After Being Banned From Site http://ping.fm/YIrGg

Ć¢€Å“Points for PakistanĆ¢€ Raises Awareness and Funds on Social Game and Virtual World Sites http://ping.fm/468jP

If you're still single, it's because God is not ready to share you yet.

8/24/10

Fix Windows 7 Master Boot Record [MBR] after installing Linux


Repair MBR in Windows 7

First, insert your Windows 7 DVD into your DVD drive and restart your computer. You should get a message asking to press any key to boot from CD.

press any key to boot from cd

Note that this message will automatically come up if your boot order is set to CD/DVD drive first. If not, you will not get the message to press any key. In that case, you can read an article on how to change the boot order in the Windows BIOS.

Next, choose the Language, Time and Keyboard and then press Next. Usually, you do not have to change anything here.

fix mbr windows 7

On the next screen, you will see a link called Repair your computer at the bottom. Click on that.

windows 7 repair your computer

System Recovery Options will now search for Windows 7 installations on your computer.

search windows installations

Once it finds it, go ahead and select your operating system and choose Next.

windows 7 repair mbr

Now you will see the list of System Recovery Options, which include Startup Repair, System Restore, System Image Recovery, Windows Memory Diagnostic, and Command Prompt. In our case, we will choose Command Prompt since we have to run a command to fix the MBR.

windows 7 system recovery options

At the command prompt, simply type in bootrec.exe /fixmbr and press Enter.

fixmbr windows 7

That’s it! Restart your computer and hopefully you will see the Windows logo instead of that horrible “Operating system not found” error message or no windows 7 at all.

Posted via email from BitHacker's Posterous

Determine IP Address From a MAC Address


There are a couple of ways you can go about doing this. Firstly, it’s important to understand that the MAC address might not be the address for a PC. It could also be the MAC address for a printer or some other type of device on the network.

If you suspect the MAC address is a printer, first check out this site below to see if it matches a major manufacturer:

http://www.curreedy.com/stu/nic/

You can also find out if the MAC address is from a switch or other networking device from HP, CISCO, etc. If you’re sure the MAC address is a computer, then try the methods below to determine the IP address.

Method 1 – DHCP Server

The simplest way to get an IP address from a MAC address is to check out the DHCP server, if possible. Whether you are in a corporate environment or at home, each computer is being assigned an IP address from a DHCP server (unless it’s a static network, which is rare).

You can either go into the DHCP console on Windows Server 2003/2008 or you can log into your wireless router at home, if that is what you are using.

find ip address

Simply go to Address Leases under the Scope and you can view both the client IP address and the Unique ID, which is the MAC address.

If you have a wireless router at home, it will vary depending on the brand (Belkin, Netgear, LinkSys, etc). But basically, there should be a section to view all the current devices connected to the wireless network.

On my AT&T U-Verse box, it’s right on the home page and I simply click on Device Details to view the MAC Address.

get ip address from mac

Method 2 – Ping Broadcast Address

The second way to do this if you can’t get access to your DHCP server is to use a useful command in Windows called ARP (Address Resolution Protocol).

Basically, you ping the broadcast address on your network from any Windows machine and then check out the ARP table afterwards.

If you subnet is 192.168.1.X with a mask of 255.255.255.0, then you would ping 192.168.1.255. When you ping, you will get a Request Timed Out all four times, but don’t worry.

ping mac address

Next, type in the following command

arp –a

You will now get a list of all the connected devices on your network along with their physical addresses! Pretty nifty trick.

arp -a

Method 3 – Free Tools

Lastly, you can use a free program to get a IP address from a MAC address. It’s called CC Get MAC Address and it can be downloaded here:

http://www.youngzsoft.net/cc-get-mac-address/

Before you can use it, however, you need to scan all the IP addresses in your subnet in order for it to work. The program itself has a auto scan feature that takes in a IP range.

You can also use a free program called Advanced IP Scanner, which will do the same thing and is a program totally dedicated to scanning IP addresses:

http://www.radmin.com/products/utilities/ipscanner.php

You can also use the IP Scanner and then simply run the arp –a command to get a list of IP/MAC Addresses.

Posted via email from BitHacker's Posterous

8/21/10

Relief Effort in Pakistan via Mike Shinoda's Blog


I need to take a quick break from LP/ATS press / promo to give you guys a heads-up on a new Music For Relief effort.

Monsoon rains have caused the worst flooding in Pakistan in 80 years.  20 million people have been affected – more than the number of people affected by the 2004 Indian Ocean tsunami, Hurricane Katrina, and the 2010 Haiti earthquake combined.
With their homes and livestock destroyed, millions of families have had their lives turned upside down.  Displaced families are camping on roadsides.  Many lack shelter, food, and clean water.

MFR is partnering with the UN Refugee Agency to help provide shelter and life-saving aid to millions of people in need. Our goal is to reach and serve 560,000 survivors, but we need your ongoing support.

Here are two ways you can help:
Make a donation to help victims of the Pakistan Floods today. Go to www.musicforrelief.org/donate to make a contribution.  100% of your donations will help survivors in Pakistan; MFR is matching individual donations up to $10,000 for this recovery effort.

Or support MFR’s Pakistan Flood Relief on Socialvibe.com.  Go to http://www.socialvibe.com/musicforrelief and complete the activities.  Even if you are unable to make a financial donation, you can help those affected by the Floods on Socialvibe.com.

Once you’ve taken action, please share your support of MFR for the Pakistan Floods on Facebook, Twitter or forward this email to friends and family and ask them to do the same.

(image credit: AP)

www.musicforrelief.org/donate

Posted via email from BitHacker's posterous

7/13/10


Till by the light of the moon she rubs her eyesSits down on the bed and starts to cryAnd there's something less about herAnd I don't know what I'm supposed to doSo I sit down and I cry tooBut don't let her see

7/10/10

How to change the MAC address of network interfaces in ubuntu


A GNU/Linux utility for viewing/manipulating the MAC

address of network interfaces

Features

* Set specific MAC address of a network interface
* Set the MAC randomly
* Set a MAC of another vendor
* Set another MAC of the same vendor
* Set a MAC of the same kind (eg: wireless card)
* Display a vendor MAC list (today, 6800 items) to choose from

Possible usages

These are some examples:

* You’re in a DHCP network with some kind of IP-based restriction
* You’ve a cluster that boot with BOOTP and you want to have a clean set of MACs
* Debug MAC based routes

Install macchanger in Ubuntu

sudo apt-get install macchanger macchanger-gtk

Command line Examples

# macchanger eth1

Current MAC: 00:40:96:43:ef:9c [wireless] (Cisco/Aironet 4800/340)
Faked MAC: 00:40:96:43:ef:9d [wireless] (Cisco/Aironet 4800/340)

# macchanger –endding eth1

Current MAC: 00:40:96:43:e8:ec [wireless] (Cisco/Aironet 4800/340)
Faked MAC: 00:40:96:6f:0f:f2 [wireless] (Cisco/Aironet 4800/340)

# macchanger –another eth1

Current MAC: 00:40:96:43:87:1f [wireless] (Cisco/Aironet 4800/340)
Faked MAC: 00:02:2d:ec:00:6f [wireless] (Lucent Wavelan IEEE)

# macchanger -A eth1

Current MAC: 00:40:96:43:39:a6 [wireless] (Cisco/Aironet 4800/340)
Faked MAC: 00:10:5a:1e:06:93 (3Com, Fast Etherlink XL in a Gateway)

# macchanger -r eth1

Current MAC: 00:40:96:43:f1:fc [wireless] (Cisco/Aironet 4800/340)
Faked MAC: 6b:fd:10:37:d2:34 (unknown)

# macchanger –mac=01:23:45:67:89:AB eth1

Current MAC: 00:40:96:43:87:65 [wireless] (Cisco/Aironet 4800/340)
Faked MAC: 01:23:45:67:89:ab (unknown)

# ./macchanger –list=Cray

Misc MACs:
Num MAC Vendor
— — ——
065 – 00:00:7d – Cray Research Superservers,Inc
068 – 00:00:80 – Cray Communications (formerly Dowty Network Services)
317 – 00:40:a6 – Cray Research Inc.

Macchanger GUI

You can open the gui by running the following command from your terminal

$ macchanger-gtk

Screenshot

Or you can do this

sudo ifconfig eth0 down
sudo ifconfig eth0 hw ether 00:a0:WH:AT:EV:ER
sudo ifconfig eth0 up

Posted via email from BitHacker's posterous

7/9/10

How to reset forgotten Ubuntu 10.04 password 


It’s really easy to reset Ubuntu password! Just log in root mode. And in Ubuntu this can be done by logging in when system reboot. So we logged in CLI mode. Here’s the way, how to reset forgotten Ubuntu password. Check it out!

Login as root

There is two possible ways to login as root :

  • Common method

You can login with root mode just by pressing ESC button when system starting up. That’ll take you to Grub Screen, when you can select mode that you’ll be used while booting. If you have double OS or more on your system (dual boot), you don’t need to do this step. It’s automatically go to Grub Screen when system starting up.

Then choose the “recovery mode”, usually found right below your default option. Press enter, and at the next screen, choose “drop to root sheel prompt” and you’ll login to the system as root :)

  • Advanced method
  • On some system, maybe you can’t find “recovery mode” on Grub Screen menu. So? You need to do a “little hack” to the Grub Loader. Looks cool right? In fact its very easy :)

    On Grub Screen menu, select default loader (first choice) and press “E” key that means you’ll edit manually that loader. Wow :)
    On the next screen, find row that contains this word :

    ro quiet splash

    Then replace that with this :

    rw init=/bin/bash

    After that, press “CTRL”+”X” (or maybe “B” key on your system, depend to your kernel

    ) to boot the system with “hacked” loader :)

    Done! You’re logged in as root on your system now, and you can do anything you want. Including resetting your password!

    Resetting your password

    Use this command to reset your password :

    passwd [username]

    Fill username with username that you want to reset its password. You’ll prompt new password twice.

    In this step, you’re almost done! Now, make sure the change you’ve made will be written to disk by :

    sync

    Reboot your system :

    reboot -f

    You’re done! Your password has been reset, and you can login to your system now :)

    I’ve been using this method on my Ubuntu Lucid system and its work. I hope this post is useful for you all. If you have problem when implementing this article, leave a comment and I’ll be glad to help you.

    Posted via email from BitHacker's posterous

    How to reset your Windows password using Ubuntu 10.04


    To reset your Windows password is very easy, as easy as resetting your Ubuntu password. What you need is bootable Ubuntu system (ie. USB, CD or anything) and software called chntpw.

    This is step-by-step to reset your Windows password:

    1. Boot from your bootable device (Ubuntu Live Session)

    Shutdown your computer and boot up using your bootable system. So you run Ubuntu on Live Session that means you run your system without install it!